A thumb sprain occurs when the thumb bends out of its normal range of movement. Usually it bends backwards, injuring ligaments at the base of the thumb at the MCP joint (metacarpophalangeal joint). It is most common in skiing, rugby, and basketball and if not treated properly often recurs. As a result, leading to long-term weakness.
Symptoms of a sprained thumb
- Pain at the time of injury, usually as the thumb bends backwards.
- Specifically, pain at the base and in the web of the thumb.
- Swelling over the metacarpophalangeal joint (MCP joint) at the base of the thumb.
- Joint laxity and instability.
What is a thumb sprain?
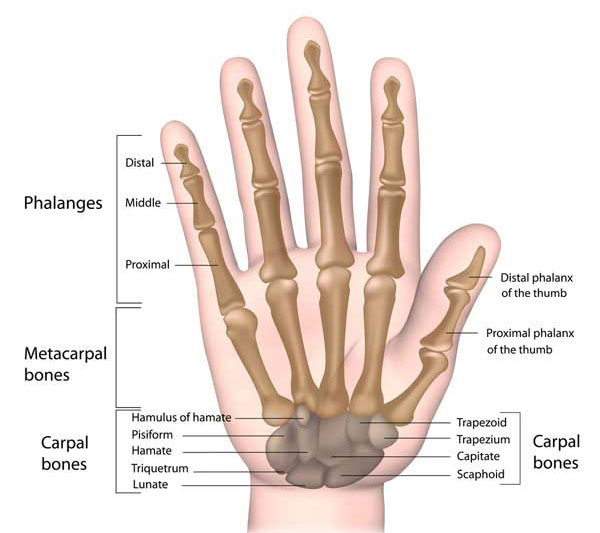
The thumb consists of the phalanges bones which connect to the metacarpal bone at the base of the thumb. This makes the metacarpophalangeal joint (MCP joint).
A thumb sprain is a tear or stretching of any of the ligaments in the thumb. However, it is far more likely that a player or athlete injures the MCP at the base of the thumb than the ligaments connecting the phalanges bones (interphalangeal joints). The thumb joint (MCP joint) has a great deal of movement. As a result, it is much less stable, therefore, more prone to sprains and dislocations.

What causes a thumb sprain?
Bending the thumb back too far is the main cause of a thumb sprain. It is particularly common in Skiing, Rugby, Judo, and other contact sports as well as ball sports such as basketball and netball. The thumb gets caught on an opponent, ball or ski pole.
Often an athlete injures it more than once making, each time making it worse and weaker. This is because once the MCP ligaments are stretched or damaged, then the thumb is less stable. As a result, it is more likely to be injured again, unless correct treatment is applied.

Treatment of a thumb sprain
Apply the principles of PRICE or protection, rest, ice, compression, and elevation.
Rest
Rest the injured hand and protect it from further injury by taping the thumb or using a wrist and thumb support.
Cold therapy
Apply ice or cold therapy as soon as possible after injury for 10 minutes every hour for the first 24 to 48 hours. Reduce frequency as your symptoms improve.
Do not apply directly to the skin as it causes ice burns. Use a wet tea towel or better, a commercially available cold wrap.
Wrist supports
Wear a compression bandage or thumb support to protect the joint and help reduce swelling. Wear this all the time during the acute phase.
Later in the rehabilitation stage, a more specific taping or thumb splint support to prevent the thumb from bending backwards may be more beneficial.

Professional advice
A professional therapist assesses the injury to rule out total ligament ruptures or a fracture.
They will also advise on a full rehabilitation program consisting of mobility exercises followed by strengthening exercises.
A surgeon may operate if there is a lot of laxity and joint instability, or if they suspect a total rupture.
Exercises
Putty exercises or hand exercise balls are particularly suitable for MCP thumb sprain injuries.
How long will it take to heal?
Most athletes are able to return to sport within 4 to 6 weeks depending on the severity of the injury, although, sometimes sooner. It is important to do strengthening exercises to restore stability and prevent re-injury.
If treated properly there is a greater risk of re-injury and eventually, permanent instability. At which point, you may need Surgery.
Taping for a thumb sprain
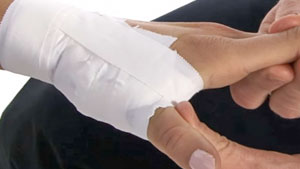
Thumb taping or wearing a thumb support is a great way to support injured ligaments while they heal and protect stretched or lax ones from further injury. View our Thumb sprain taping video to learn how to apply sports tape to protect the MCP thumb joint.