Here we demonstrate three ways to tape fingers following a finger sprain or similar injury. The first method is for injuries to the base of the finger where the metacarpal (hand) bones join to the phalanges (finger bones). The second technique prevents your finger from bending, and the third method prevents straightening. The finger taping technique you need depends on your specific injury and the movements you wish to prevent.
The following guidelines are for information purposes only. We recommend seeking professional advice before attempting any self-treatment.
Sprained finger taping (MCP joint)
This is a simple taping technique for a sprained finger where ligament damage occurs at the base of the finger. The point where it joins the metacarpal bones of the hand is the metacarpophalangeal(MCP) joint. The aim is to prevent painful movements of the fingers whilst healing. Although shown for the index finger, you can adapt this finger taping for any one of your digits.
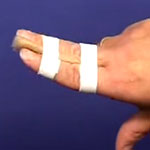
Tape fingers to prevent flexion (bending)
This technique prevents the bending of the finger joint. We use it for finger injuries which need to heal in a straight position. In other words, it prevents your finger from bending.
Tape fingers to prevent straightening
We use this finger-taping technique if you have sprained your finger by bending it back too far.

Finger buddy taping

The finger buddy technique is probably the most popular way to tape fingers, especially a sprained finger. It protects the phalangeal joint between the finger bones (phalanges).
The aim is to prevent movement of the injured finger during the healing stage of rehabilitation. Fingers 1 and 2 are usually ‘paired’ and 3 and 4 are usually best taped together.
What type of tape do I need?
Either 2.5 cm (1 inch) non-stretch zinc oxide tape or smaller is best for finger buddy taping. In particular, the narrower tape is better for smaller fingers.
If you do not have any then tear wider tape along its length to make thinner strips. You can also place a thin strip of foam padding between the fingers for comfort.
Step 1
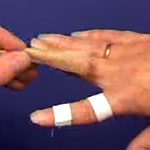
Apply two strips of 1.25 cm (
Step 2
Then place the strip of padded foam between the fingers.
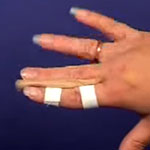
Step 3
Apply two supporting strips from the two anchors above and below the joint around the ‘buddy’ finger. This should allow the fingers to bend together but sideways movement should be limited.